


Good Lay
01 Intro ☐
Laying down and taking up marley is a routine part of life in the dance world. Although it is labor intensive and a bit tedious following a simple procedure will get the job done with excellent results.
02 Always sweep before lay ☐
Before you start always sweep very well the area where you will be laying out the marley. If you fail to do this you’ll inevitably end up with small bits of detritus under the marley that can be quite painful to step on and destructive to the floor. Also, if the floor is dirty when you lay down the marley when it is rolled up the dirty will stick to the marley requiring greater cleaning the next time you use it. So sweep up! And it wouldn’t hurt to do a light mopping beforehand as well.
03 Relax the floor ☐
Marley comes in large rolls. The size and weight of the rolls is quite variable depending on the type of floor. It’s advisable to have two people move each roll. If you only have one person or if the rolls are particularly heavy get a small dolly to move the rolls around.
Because marley is essentially a type of vinyl it will expand and shrink quite with changes in temperature. Before installing a floor you should lay the rolls out flat and let them sit for an hour or so with the room at performance temperature to let the marley get acclimated. This is especially important if the marley has not been used in a long time or has been stored in a room that is considerably colder that the one where it will be used.
If you lay down the floor with the room at a temperature colder that of performance when the room heats up the floor will become a bit slack. If you lay it down at a higher temperature than performance then your floor will be more taught when the room gets to performance temperature, this may sound good but if the floor is particularly elastic it can sometimes pull itself loose from its tape which will require laying re-laying.
In a theater the temperature for crew work is often set bit lower than when performers or the audience are in the space. And often putting down dance floor is one of the first tasks done, before the theater has warmed up to it’s normal temperature. So it is important to lay out the floor and allow it to warm up to the temperature of the room. Sometimes the theater is just cold and there is nothing that can be done about it. (a corollary to the axiom “never fight a land war in asia” might be “never lay a marley south of the Yangtse River in January!” Those theaters are cold and it’s illegal to turn on the heat!)
If the space is available lay the panels out where they will be used. This will save in moving them about later. If the space must be used for other activities while the floor is relaxing you can roll them out one on top of another to the side of the space.
04 Orientation of the panels ☐
Before you lay out the floor you’ll have to choose which direction to orient the panels. There are two factors that go into choosing the orientation: how it fits and how it looks.
First we’ll consider how to lay out panels in a studio or other open space and in a proscenium theater.
In a studio you’ll want to cover as much of the floor as you can with marley. First you should measure the dimensions of the room, then the length and width of your marley panels. Panels should run in the direction of the larger dimension of the room. Hopefully the panels are a good length to fill most of the floor in this direction. I(f your panels are longer than the room then you have a bit of a problem. Ideally you’ll cut the panels to fit the room. Or, if that’s not possible, you can leave the excess rolled at one end of the room. Leaving excess on the roll is not ideal but see the section below on installing a floor on a stage in the Upstage/Downstage direction for instructions on how to do so.)
So, assuming that your panels fit in the room, multiply the width of your panels by the number of them you have. If this number is less about 4 feet (1.3m) less than the short dimension of your room then begin by laying your first panel at the wall opposite the mirrors or the side you imagine the audience being. This will leave a small un-danceable strip of floor but this area is a bit close to the wall to dance plus choreographers will often sit in this area looking at the dance from the side that the audience will watch from. If your marley is more than 4 feet (1.3m) shorter than your floor you may wish to split the uncovered space between the front and back.
In a proscenium theater situation the floor can run either across the stage or upstage/downstage. If you are walking into a situation where the marley is already cut to size you will probably not have any choice, you’ll have to lay it out the way it fits.
If the panels are longer than the proscenium is wide then they were probably meant to be laid across the stage. If they are shorter than the proscenium is wide then they are probably meant to lay upstage-downstage. Panels laid across the stage create the impression of a wider stage while panels laid upstage-downstage create a stage that appears deeper. A cross stage lay is also best if you have a performance in which dancers or objects will be dragged on and off the stage. Dragging things across tape seams makes the edeavor a stop and go affair as the object being dragged will tend to lag as it sticks to the tape seams. As well the tape seams will get pulled up by dragging things across them.
Panels cut to be laid out cross stage can be used laid upstage/downstage but there are a couple of problems. First of all you probably will not have enough panels to fill the stage. If this is the case you may need to find extra panels, perhaps from another set of marley. Even though different sets of marely may both be black they very rarley match exactly in color, texture and wear. If you are forced to lay down two different sets of marley on the same stage you’ll have to make an informed choise so as to minimize the effect of their differing appearances. The most important thing to avoid is asymetry when laying down two different floors. If you have more of one type than another it is best to lay it down from center out and use the second set for the outer panels, again it is most important to make the stage symetrical. (yes, asymetry is a very powerful tool in art, but that is best left to the artists who perform the stage not forcing it upon them before they’ve begun.)
4.5 Positioning the Panels ☐
Put the first panel in position. In an open studio or performance space this will be defined by where you want the performance area to begin. If you are
laying the marley across the stage lay the first piece as close to the proscenium as possible.
05 Attach the first panel ☐
Put the first panel in position. In an open studio or performance space this will be defined by where you want the performance area to begin. If you are laying the marley across the stage lay the first piece as close to the proscenium as possible.
On the stage you’ll want to be sure that the first panel is as centered as possible. Put a mark down at centerline and the downstage edge of where you want your first panel. If the theater does not have it marked find the center by measuring the distance between the proscenium walls, divide it by two, measure that distance from one of the proscenium walls and put down a mark there. Now measure the
If you are laying the marley upstage-downstage you’ll start from center out. If it takes an even number of panels to cover the stage from wing to wing then snap a line on the center line of the stage with a chalk-line, then lay the first panel to one side or the other with it’s edge following the chalk line as closely as possible.
Once in place its time to tape down the first panel.
Choose one end to be your anchor side. You will tape this end down and stretch your panel away from it. If you are laying down a marley upstage-downstage you will want to have the downstage end the anchor side. This is so the visible downstage side can be laid in a nice straight line, if there is any variation in length between the panels it will be upstage hidden behind the backdrops.
Put three or three tape “tabs” on the anchor end of your marley. Tabs are pieces of tape approximately 1’ (30cm) in length. They are attached to the end of the marley in the direction of the panel; half on the marley, half on the floor. (photo: tab) Apply them so the pieces are spaced evenly across the end of the panel and are half on the panel and half on the sub-floor. Rub down the tape so it sticks well.
Next attach the anchor end of the panel to the floor with a “bead” of tape. A bead in a piece of tape the same length as the end of the panel. It attaches to the edge of the end of panel with half its length on the marley and half on the sub-floor. (photo: bead)
Now it’s time to stretch the panel from the anchor end to the opposite side.
Put three or four tape tabs on the stretching end of the panel but his time attach and rub down the tabs only on the panel side. Instead of fixing the tabs to the sub-floor fold them back so they are sitting on the marley sticky side up ready to be stuck down when the stretching is accomplished. (photo: back tabs)
Depending on the elasticity of the panels there are several ways to stretch your marley. Most modern dance floor is light weight and elastic enough that it be stretched by hand; provided that it is reasonably warm.
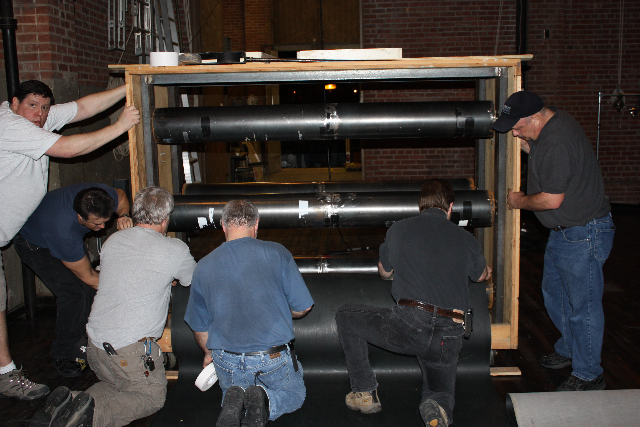
Stretching is ideally done with a team of 4-5 persons and two push brooms. The first person (ideally the heftiest person on the crew) simply stands on the marley at the anchor end of the panel providing dead weight so that the anchoring tape doesn’t get pulled up by the stretching process. Two other people kneel facing the stretching end of the panel. And the last two people with push brooms start at the anchor end just in front of the dead weight person. (photo: marley positions)
With both hands the two pullers stretch the panel towards themselves as hard as they can. In order to get the best stretch sometimes it is best to pull small pulsing pulls as with each pulse you can get a little bit more stretch out of the panel. Simultaneously he two broomers walk side by side from the anchor end to the pulling end pushing their brooms in front of them. They are pushing all the air out from underneath the panel and assuring that it lays flat.
When the broomers reach the stretching end of the panel they must stop and hold still for a moment; their weight holding the panel stretched. The pullers then flop over the three tabs and secure them to the deck. The broomers must then immediately put down a bead to finish securing the panel.
You may have seen people “kicking out” or “scootching” marley to stretch it. While this can be very affective it is best to attempt to stretch panels by hand first and to proceed to more drastic methods as need demands. With repeated scootching is possible to damage panels by marking or over-stretching them in the process. Alas some, particularly older, floors require a a bit more effort to get them stretched out. If you find yourself facing one of these floors have your broomers put aside their brooms and convert themselves into scootchers. Now instead of brushing out the air from under the floor the scootchers will, with every step or jump, throw the weight of their bodies to help stretch the panel. There are two industry standards for scootching: the bunny hop and the zombie walk.
The bunny hop, much as it sounds, is when the scootchers make a series of short hops all along the panel from the anchor towards the stretchers. With each hop they jam their feet towards the stretchers who should get in a rhythm of pulling with each hop.
The zombie walk, much as it sounds, is when the scootchers walk, instead of hop. With each step they jam their feet into the floor kicking it towards the stretchers. When the zombie reach the end of the panel they hold still while the stretchers tape down the tabs and bead, then eat their brains.
When scootching the dead weight person is more important than ever as the stretching force is more intense and can really pull up the anchor tape. Also, before scootching, you must check the shoes of the potential scootchers to make sure that they don’t mark the floor.
Position one person standing on the panel at the anchor end, have one person standing off the panel at the stretching end ready to step onto the panel and prevent it from releasing once its been stretched. Two people must knee on the floor at the stretching end facing the person standing on the anchor end. They must grab the end of the panel with their hands spaced out evenly. On the count of three they pull the panel toward them strongly and evenly. When they’ve stretched as much as they can the waiting person steps onto the panel, once she is on the panel the two on the floor flip the tabls over and stick them well to the floor. Then they should attatch a bead to this end before the dead weight person steps off.
Check out the floor. It should be flat and even acroos the entire panel. There might be a tiny bit of pinching at the stretch end. This happens at the points where the hands have been pulling at the marley. As long as it is minor it is not problem. To completely avoid it you might use a thin strong stick the width of the marley
• VII Kick out wrinkles in center or edges ☐
• VIII Pro and Cons of various types of tapes ☐
• IX Tape Roller ☐
• X Touring fashion: Surface tape (either vinyl floor tape or gaffer’s tape) is used to tape the panels ☐
of vinyl together. The panel seams are typically left an 1/16 of an inch apart. Most people can
install a floor by touring fashion on their own. (Tape has to be replaced every 3 to 6 months)
Undertaping Variation
Semi-permanent: Double stick tape is used to secure the panels of surface vinyl, with the panel
seams being put together as tight as possible. This is a harder installation than touring fashion,
but can be accomplished by most adept “handy-men”.
Permanent: The vinyl surface floors are glued down and the seams are hot welded by a
professional floor installer, who is practiced at the art of heat welding.
• XI Undertaping ☐
• XII Undertaping with seam fill ☐

